
You have scrubbed the outside of the oven door until it shines. You have done the inside face too. And the brown, streaky haze is still there, sitting in the middle of the glass where no cloth will ever reach it. This is the single most frustrating cleaning problem in the kitchen, and the reason is simple: the grime is not on your oven door, it is inside it.
Here is the honest answer up front. There are only two ways to clean between oven door glass. The first is to reach the gap through the ventilation slots in the door, which works on some ovens and reaches only part of the pane. The second is to take the door off and separate the glass layers, which reaches everything and is the only complete fix. Which one is available to you depends entirely on how your particular door was built, and that is where most guides stop being useful. This one starts there.
Why the grime is between the panes, not on them
Almost every oven made in the last twenty years has a double or triple-glazed door. Two or three sheets of toughened glass sit in a frame with air gaps between them, because that is what keeps the outer surface cool enough to touch while the cavity runs at 220 degrees.
Those air gaps are not sealed. They cannot be. Trapped air would expand and burst the panel, so manufacturers vent the cavity with a row of narrow slots along the top edge of the door, and sometimes along the bottom. Air is drawn in low, warms, rises and exits high, and that steady convection is what keeps the outer glass safe.
It also means the inside of your door breathes the same air as your roast. Every time you cook, the vapour rising off the food carries fine airborne fat. Some of it is pulled into the door cavity, where it meets the cooler inner faces of the outer pane and condenses. Then the oven runs hot again and bakes it on. Repeat that a few hundred times over a few years and you get exactly what you are looking at: a thin, hard, evenly spread brown film on a surface you cannot touch.
Two useful things follow from this. Firstly, the film is not a sign you have done anything wrong. It is a by-product of how the door is designed to work. Secondly, it will come back, because the vents cannot be blocked. The goal is a door that is clear now and easy to keep clear, not a door that never fogs again.
First, work out which door you have
This is the step nearly everyone skips, and it is the one that decides whether the next hour goes well. Oven doors fall into three groups, and only two of them can be cleaned between the glass.
Vented and serviceable. The door has visible slots along the top edge, and the inner glass panel is held by screws or clips you can reach once the door is off. Most mid-range and premium built-in ovens are like this. Both methods below are open to you.
Vented but bonded. The door vents, so grime gets in, but the inner panel is glued or riveted rather than fixed with screws. You can attempt the vent-slot method, but the door will not come apart without destroying it. A surprising number of budget and older ovens sit here.
Factory-sealed. Some pyrolytic and high-end European models use a sealed glass cartridge that is replaced as a unit rather than opened. There is no user-serviceable route in at all.
To find out which you have, let the oven cool completely, then run through this:
- 1Look along the very top edge of the door, above the handle, with a torch. A row of narrow slots means the cavity is vented and reachable.
- 2Open the door fully and look at the inner frame around the glass. Visible screw heads, usually two to six of them along the top or the sides, mean a removable inner panel.
- 3Check the trim strip along the top of the inner door. On many models the screws hide underneath it and it unclips.
- 4Search your model number plus the words door glass removal, and look for the manufacturer's own instructions. Most brands publish them, and if yours does not, treat that as a warning.
- 5If the oven is under warranty, read the terms before you touch a fixing. Dismantling the door yourself voids cover on a good number of brands.
If you cannot find slots, screws or a manufacturer instruction, stop. A bonded or sealed door is not a job you can win, and the attempt usually ends with a chipped panel. This is also the point where knowing your specific appliance matters most, which is why we treat premium and European ranges as their own discipline in our guide to caring for European ranges like Belling, ILVE and Smeg.
Method one: cleaning through the ventilation slots
This is the low-risk option. It reaches the top third of the pane, sometimes a little more, and it will not touch a film in the lower corners. On a moderately hazed door it can still make a genuine visible difference in twenty minutes.
You will need a thin flat tool that is longer than the door is deep, a wooden ruler, a paint stirrer or a plastic spatula handle all work. You also need a few thin microfibre cloths, a spray bottle of warm water with a little dishwashing liquid, and a rubber band or two.
- 1Make sure the oven is completely cool. Never introduce anything damp to warm glass, because the thermal shock can crack a toughened pane.
- 2Wrap a thin microfibre cloth around the end of your flat tool and secure it with a rubber band, so nothing can slip off inside the door. This matters. A cloth lost in the cavity is a dismantle job.
- 3Dampen the cloth lightly with the soapy water. Damp, not wet. Water pooling in the bottom of a door cavity has nowhere to drain.
- 4Slide the padded tool through one of the ventilation slots and work it slowly across the glass in overlapping passes. Use gentle, even pressure and let the cloth do the work. Never force the tool sideways against the pane.
- 5Change to a fresh cloth as soon as the one you are using loads up with grease. A dirty cloth just redistributes the film.
- 6Finish with a dry cloth on the same tool to buff off moisture, then leave the door open for an hour so the cavity dries fully.
Be realistic about the result. You are cleaning blind, through a slot, at arm's length. It lifts loose film well and does very little to hard baked-on carbon. If the haze is dark brown and even, it has been baking for years, and this method will lighten it rather than remove it.
Method two: taking the door apart
This is the complete answer, and it is genuinely more involved than most articles admit. Read the whole method before you start, and stop at the first step that does not match your oven.
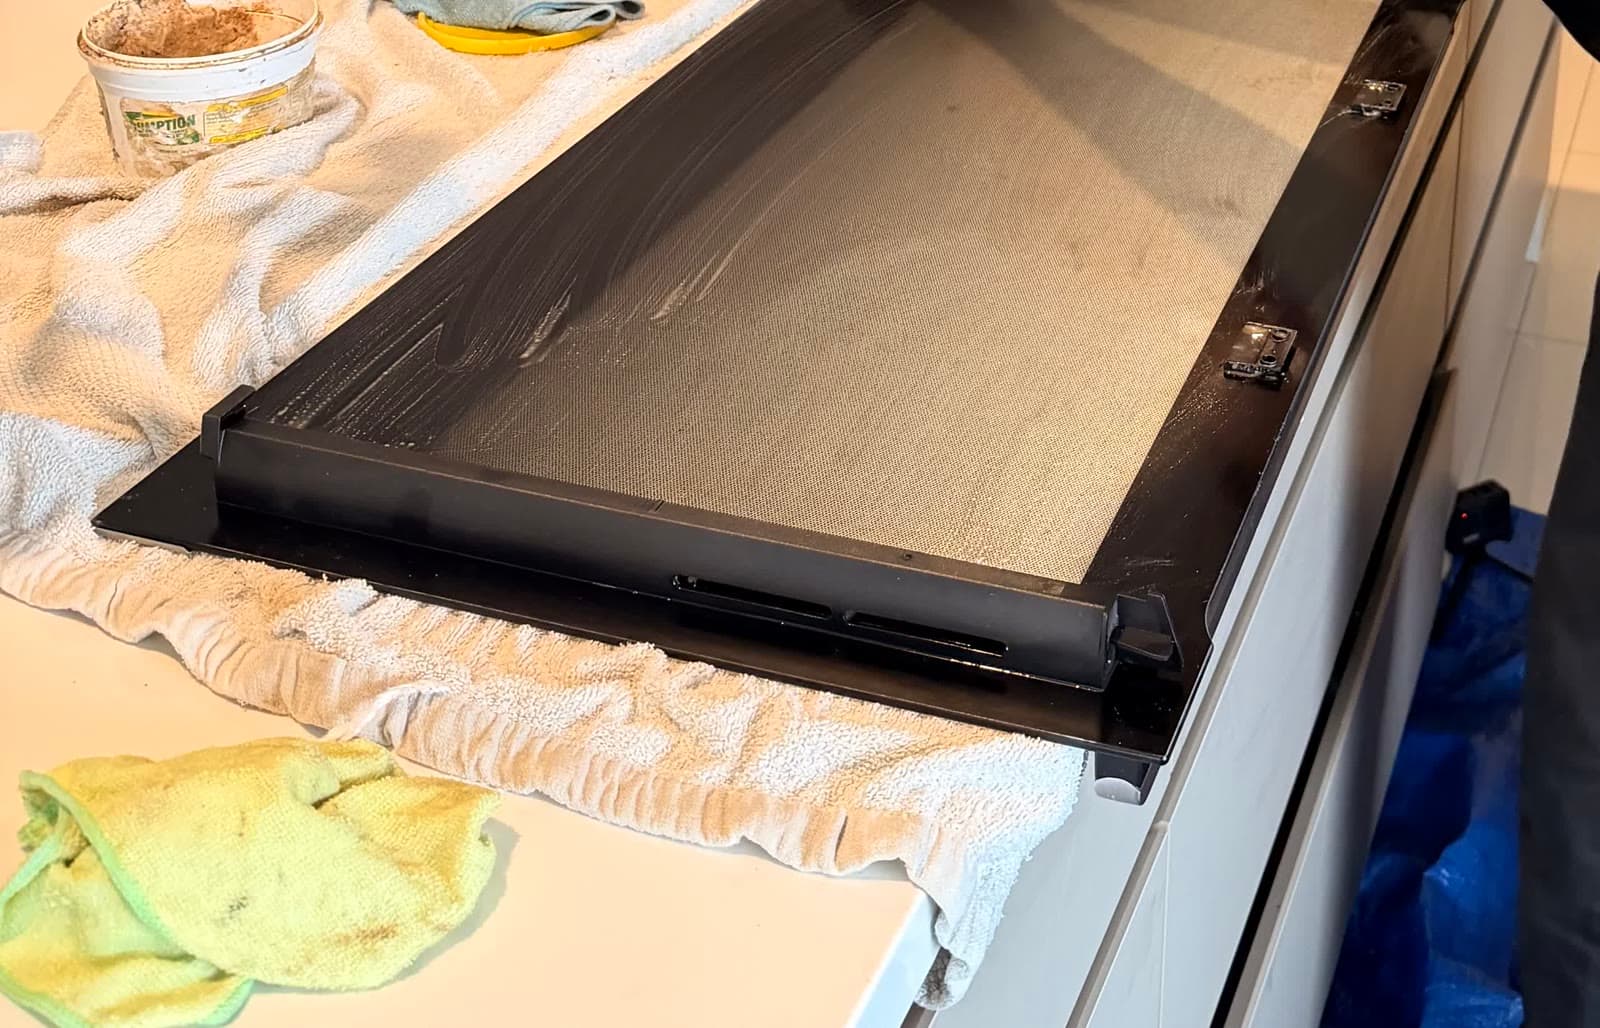
- 1Cool and isolate. Oven completely cold, then switch it off at the wall. Lay an old towel or blanket over the open oven door and across the floor in front of it.
- 2Take the door off. Open it fully. Most hinges have a lever, clip or locking pin at each side that must be flipped to disengage the spring. Release both, then close the door to roughly the angle the manual specifies, usually around fifteen to thirty degrees, lift it straight up and pull it towards you. Oven doors are heavier than they look, often eight to fifteen kilograms on a wide model. Use two people.
- 3Never let a hinge close on itself. The springs in an oven hinge carry serious force. An unrestrained hinge snapping shut will take a fingertip. Keep hands clear of the hinge arms at all times.
- 4Lay it flat and open it. Put the door face down on a padded, protected surface. Not the floor, and not bare stone. Unclip the top trim if there is one, then remove the fixings holding the inner panel. Keep every screw, clip, spacer and rubber grommet in order as it comes off, because they are not interchangeable and the door will not seal without all of them.
- 5Separate the panes carefully. Lift the inner glass straight up and out. Do not lever it, and do not put pressure on a corner or an edge. Toughened glass is strong across its face and fragile at the edges, and when it fails it does not crack, it shatters into thousands of pieces at once.
- 6Clean every exposed face. Now that the surfaces are open, a thick paste of bicarbonate of soda and a little water is the safest thing to use. Spread it on, leave it twenty to thirty minutes to soften the baked film, then work it with a damp microfibre cloth and rinse clean. The same logic applies here as everywhere else in the oven, which we cover in detail in our review of natural oven cleaning methods that actually work.
- 7Dry completely, then reassemble in reverse. Every face bone dry, every spacer back where it came from, every screw firm but not overtightened. Glass does not forgive an overtightened fixing.
- 8Refit and test. Rehang the door, reset both hinge locks, then check it. It should close flush, seal against the gasket all the way round, and hold itself shut. If there is a gap, a rattle or resistance, take it off and start the reassembly again rather than living with it. A door that does not seal costs you heat, accuracy and money on every roast from now on.
The five things that go wrong
We get called out to fix all of these, so they are worth naming plainly.
- Shattered panes. By a wide margin the most common. Edge pressure, a levered corner or a knock on a hard benchtop, and a toughened panel is gone. Replacement door glass is frequently a hundred dollars or more, when it is available at all, and on older models it is often discontinued.
- A door that will not seal. A missed spacer or a clip in the wrong slot leaves the panel sitting a millimetre out. The door looks fine and leaks heat permanently.
- Stripped coatings and lost markings. The inner faces of many panes carry a low-emissivity heat-reflective coating, and the outer glass often carries printed temperature markings. Abrasive pads and caustic oven sprays take both off, and neither comes back.
- Hinge injuries. A spring-loaded oven hinge releasing unexpectedly is the single genuine safety risk in this job.
- A voided warranty. Plenty of manufacturers treat a dismantled door as owner damage. On a two-year-old premium oven that is an expensive hour.
One more, less obvious than the rest: some people clean the film off successfully and then block the ventilation slots with tape to stop it returning. Do not do this. Those vents are what keeps the outer glass cool and the panel from over-pressurising.
What never to use on oven door glass
- Steel wool, scourers and abrasive powders. They scratch toughened glass permanently.
- Caustic oven sprays on coated or printed glass. They cloud coatings and lift markings.
- A metal blade held flat. If you must scrape, use a ceramic-glass scraper at a shallow angle, and only after the film has been softened.
- Cold water or spray on warm glass. Thermal shock cracks panes.
- Anything at all on a bonded or factory-sealed door beyond the vent-slot method.
How Oven Valets approaches it differently
We have been cleaning ovens across Sydney and greater NSW since 2013, and door glass is not a bonus we throw in. It is one of the main reasons people call us, because it is the one part of an oven that a determined home cook genuinely cannot fix.
The difference is not that we work harder at the same job. It is that we are not improvising on your kitchen bench. By the time a technician has a screwdriver in hand, the make and model has already told them whether that door is designed to come apart, what holds it together and how it has to go back. We will not open a door that should not be opened, and we will tell you on the spot if yours is a sealed unit, rather than finding out halfway through.
What we do once the door is open is our own method, developed over more than a decade, and we keep the detail of it to ourselves. What we will happily commit to is the standard it is held to:
- Every internal face of the glass comes up clear, not lightened.
- Nothing caustic goes near a coated or printed pane, because our products are non-caustic and biodegradable.
- The door goes back to factory specification, with every spacer and fixing where it belongs, and it is checked for a full seal before we leave.
- There is no chemical residue and no fumes, so the oven is safe to cook in as soon as we are done.
- We are fully insured. That is the part worth weighing most carefully, because when a pane shatters in your hands on a Sunday afternoon, the cost is yours. When it happens on our watch, it is ours.
- The door glass is included in the price of the clean. It is not an add-on and there is no separate charge for a double-glazed door.
Door glass is part of a standard clean on our oven cleaning service, and where a door is more involved, for example a wide or triple-glazed premium range, it is covered by our premium oven cleaning service. Both are fixed and GST-inclusive with no call-out fee, and you can see exactly what different jobs cost on our oven cleaning cost page. We would rather you read our genuine customer reviews, which name real suburbs and real ovens, than take our word for any of it.
So should you do it yourself?
A straight answer, because the internet is short on them.
Try the vent-slot method yourself if your door has slots, the haze is light to moderate, and you are content with a visible improvement rather than a perfect result. It is low risk, it costs nothing, and the worst realistic outcome is that it does not help much.
Consider a full dismantle yourself only if all of the following are true: the manufacturer publishes removal instructions for your model, the oven is out of warranty, you have a second person and a padded surface, and you would be genuinely relaxed about replacing a glass panel if it broke.
Call someone if the door is bonded or sealed, if the oven is a premium or European range, if it is still under warranty, or if the film is dark and baked hard. Also call if the glass is only one part of the story. When the cavity, racks and trays are as far gone as the door, a dismantle for the glass alone is a lot of risk for a fraction of the result, and our guide to cleaning an extremely dirty oven explains where that tipping point sits.
For the outer and inner faces of the door, which are a much more forgiving job, our step-by-step on cleaning oven door glass covers the surface method in full.
Keeping it clear once it is clear
You cannot stop the vents breathing, but you can cut down what they breathe.
- 1Wipe the inner door face with warm soapy water every week or two, before grease has a chance to bake. Less surface fat means less airborne fat.
- 2Cover fatty roasts loosely for part of the cook. Most of the film that ends up between the panes started as splatter vapour.
- 3Deal with spills once the oven is warm rather than hot, and never leave them for months.
- 4Run the rangehood whenever you roast. A working extraction fan pulls vapour out of the kitchen instead of letting it circulate back through the door.
Done consistently, that turns a two-year problem into a five-year one, which is about as good as the physics allows.
If the haze between your panes is past the point where careful wiping touches it, that is the door telling you it needs to come apart, and that is a job worth handing to someone who does it every working day and carries the insurance for it. We cover Sydney and greater NSW, from the Hills District to the Blue Mountains and up the coast, and you can check your suburb on our service areas page or read how we work across the city on our Sydney oven cleaning page. When you are ready, book a clean online from $210 with fixed GST-inclusive pricing and no call-out fee, and we will have the door clear all the way through, panes and all.